At work I inherited a really old website running on React.
The code was good but by old i mean really old; last commit was 3 years ago and most of the code was 5-6 years old…
So I converted it to TypeScript and ripped out the old babel/webpack build system and installed Vite to handle all the builds.
Everything went pretty smoothly and I got the site up and running with no errors in development mode.
When going to production is when things went sideways. Some pages crashed with the following error:
error: Minified React error #130; visit https://reactjs.org/docs/error-decoder.html?invariant=130&args[]=object&args[]= for the full message or use the non-minified dev environment for full errors and additional helpful warnings.
    at vc (vendor.93c27df6.js:23)
    at d (vendor.93c27df6.js:23)
    at vendor.93c27df6.js:23
    at vendor.93c27df6.js:23
    at Ts (vendor.93c27df6.js:23)
    at ul (vendor.93c27df6.js:23)
    at ic (vendor.93c27df6.js:23)
    at tc (vendor.93c27df6.js:23)
    at ql (vendor.93c27df6.js:23)
    at zl (vendor.93c27df6.js:23)
Some quick googling led me to a GitHub issue showing me that I was not alone with this bug.
Package problem number one
It seems that esbuild is checking for __esModule at runtime and rollup (which is used internally in Vite) is not.
So it will happen to any library that has an entry point with: module.exports = require("./module");
Since a file exported this way does not include the ’magic string’ __esModule as checked by generate-exports.js it’s not converted correctly.
In my case I had two librarys acting up; react-datetime which was imported locally like this: import DateTime from "react-datetime"; which worked fine in Vite dev but not production.
The second package with this issue was react-dropzone which in turn used the real culprit; attr-accept
Since the project used an old version (4.x.x, latest version is at the time of writing 14.x.x) and I got other issues upgrading to the latest version I could rule out a PR from me fixing it.
Using environment variables is a great way to store environment specific values and secrets that should not be in the git repo.
Lets say you have an API which runs on localhost locally but a different host in production.
On the server
Locally you need to add an .env.local-file in your project root containing a variable for the api host name, lets call it API_HOST and point it to localhost port 8080.
# .env.local in project root
API_HOST=http://localhost:8080
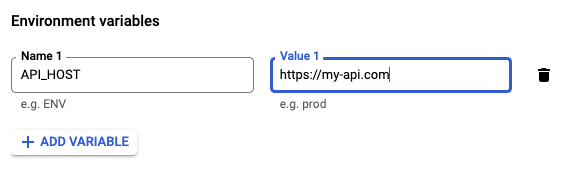
You would then need to add the environment variable to your production env as well. This will look different depending on your hosting provider but on Google Cloud Run it looks like this:
On the client
To expose your environment values to the client, you need to add them to your next.config.js
In most cases keeping using the variable on the server is enough, but in some cases you might need to access the environment variable on the client as well and in those cases you need to add the variable to your next.config.
If you can’t stay away from JavaScript, the <details>-tag has a toggle-event that you can subscribe to for updates.
<datalist>
The <datalist> tag specifies a list of pre-defined options and allows users to add more to it. It provides an autocomplete feature that allows you to get the desired options with a type-ahead.
It would be easy to think of this as an alternative to the <select>-tag, but it should be seen as a text-input with built in suggest functionality since the user is not forced to explicitly select one of the given values.
There seem to be some issues when using datalist with a large list (> 512) of options so you might want to consider how many items you put in the list.
<meter>
Use the <meter> tag to visualize a value in a range of numbers. The most common use case I’ve seen is for visualizing the strength in a password.
The <mark>-tag is used to semantically highlight any text for clarity and is maybe best used in search results to mark parts of a bigger text block.
Code:
<p>“Ph’nglui mglw’nafh Cthulhu R’lyeh wgah’nagl fhtagn.”</p>
<p>Legrasse had one point in advance of Professor Webb, for several among his mongrel prisoners had repeated to him what older celebrants had told them the words meant. This text, as given, ran something like this:</p>
<p>“In his house at R’lyeh dead <mark>Cthulhu waits dreaming.</mark>”</p>
<p>And now, in response to a general and urgent demand, Inspector Legrasse related as fully as possible his experience with the swamp worshippers; telling a story to which I could see my uncle attached profound significance. It savoured of the wildest dreams of myth-maker and theosophist, and disclosed an astonishing degree of cosmic imagination among such half-castes and pariahs as might be least expected to possess it.</p>
Legrasse had one point in advance of Professor Webb, for several among his mongrel prisoners had repeated to him what older celebrants had told them the words meant. This text, as given, ran something like this:
“In his house at R’lyeh dead Cthulhu waits dreaming.”
And now, in response to a general and urgent demand, Inspector Legrasse related as fully as possible his experience with the swamp worshippers; telling a story to which I could see my uncle attached profound significance. It savoured of the wildest dreams of myth-maker and theosophist, and disclosed an astonishing degree of cosmic imagination among such half-castes and pariahs as might be least expected to possess it.
Autocapitalize <input>
While not a tag, the autocapitalize attribute can be added to input-elements to force digital keyboards, usually on mobile devices, to behave in a certain way.
It’s good to know that the attribute will not do any changes to the actual value for the input, so it will have no impact when used with a physical keyboard. autocapitalize will make the mobile keyboard change case depending on the value given to the attribute.
Code:
// none: all letter should default to lowercase
<input type="text" autocapitalize="none" />

// characters: ALL CHARACTERS SHOULD BE UPPERCASE
<input type="text" autocapitalize="characters" />

// characters: First letter of each sentence should be uppercase
<input type="text" autocapitalize="sentences" />

// characters: First Letter Of Every Word Should Be Uppercase
<input type="text" autocapitalize="words" />
It should be noted that an input of type url, email, or password will not use autocapitalize.
On bergqvist.it I used styled jsx for styling my components. I preferred that to other css-in-js frameworks (like JSS) because of it actually using CSS syntax instead of JavaScript objects.
// styled jsx example with good old CSS
<style jsx>{`
  .label { color: red; font-style: italic; }
  .article { padding: 0; }
`}
</style>

//JSS example with CSS as a JS object
const useStyles = createUseStyles({
  label: {
    color: 'red'
    fontStyle: 'italic'
  },
  article: {
    padding: 0
  }
})
I like Styled jsx but it has had an issue with FOUC in the last few versions of Next.js though, and with Next 12 I decided to try something new and migrate to CSS Modules instead.
What is CSS Modules?
A CSS Module is a CSS file in which all class names and animation names are scoped locally by default.
So the benefit are the same as css-in-js-frameworks but pure css (or in my case scss) files are used instead of keeping the styling in the javascript files.
I may be old school, but I actually prefer to keep the CSS and JavaScript separated for each other. I can see the benefits of keeping them tightly coupled and can agree that simple, self-contained components probably benefit from this approach, but it gets messy when the component has many styles with media queries.
I also want to use SASS, which is fully supported with CSS Modules in Next.js.
Migrating from styled jsx to CSS Modules
Since Styled jsx use regular CSS it’s actually just a matter of creating the <component>.module.scss-file, importing it into the component and changing the classes
As I already had a global css-file that I imported into my _app.tsx, I really did not have to do anything to get my global classes working. If you want to add a global class in a component file you can add it by using :global() on the class.